







Diberdayakan oleh Blogger.
Tampilkan postingan dengan label updates. Tampilkan semua postingan

Selasa, 22 April 2014

How to Slipstream Windows Updates Into Your Installation Disc

How to Slipstream Windows Updates Into Your Installation Disc

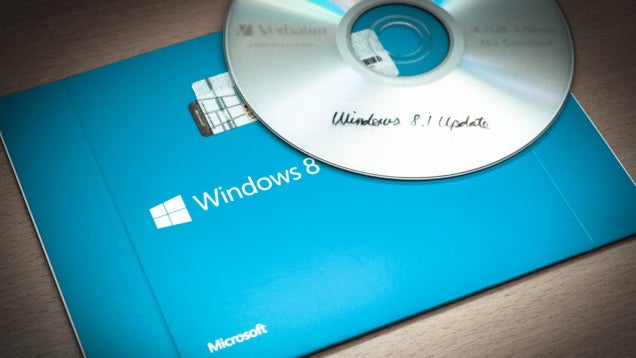
One of the horrors of reinstalling Windows is the endless amount of software updates and reboots required to get it secure, stable, and current. But there's a better way: slipstreaming. With a bit of prep, you can create a new installation disc with all the updates included, so everything installs at once.

What Is Slipstreaming?

Slipstreaming is a method in which you integrate software updates with the original installation media. That means if you have, say, a Windows 8.1 disc, you can "slipstream" the latest updates into the disc itself, so those updates are installed with Windows instead of afterward. This reduces the number of times you need to update and restart your system, and is also useful if you're installing Windows on multiple PCs or if you have a slow internet connection.

Microsoft's own command line slipstreaming tools were pretty straightforward to use with Windows XP, but the process changed and became more of a chore with Windows Vista. Fortunately, third-party utilities make slipstreaming less complicated and offer additional features.

Why Should I Slipstream?

Slipstreaming was originally intended for businesses to make it quicker and easier for IT staff to keep multiple systems up to date, but it's just as useful to end users who frequently reinstall Windows. It keeps all the monotonous updating and rebooting to a minimum and if you use one of the third-party utilities, you can customize the installation to your liking. With WinReducer 8.1, for example, you can bypass the EULA and language screens to make the install go even quicker. You can also remove built-in programs, enter a computer name, set mouse sensitivity, and a whole lot more.

Sound familiar? We've actually discussed this before, in our guide to creating a customized Windows 8 installation. We're going to discuss the same tool today, though with a bit more focus on the slipstreaming portion of the process and why you'd do it—so if you're a beginner, you should have no trouble with this guide and can skip the more advanced stuff. Windows 7 users can check out this guide for a Windows 7-based alternative.

How to Slipstream Windows 8.1 Update 1

For today's example, we're going to slipstream the latest Windows 8.1 update into a Windows 8.1 installation disc. The update is free and available through Windows Update, but if you want to slipstream the update to your Windows 8.1 media, it's very easy to do. Here's what you'll need for this particular example:

  • A PC running Windows 8.1
  • WinReducer 8.1 and its required third-party software (see below)
  • A Windows 8.1 retail disc or official ISO (upgrade discs and ISOs won't work)
  • An 8GB USB flash drive to create the installer

After you download WinReducer 8.1, you'll also need to download some third-party utilities that it needs, including:

When you're ready, move on to the steps below to begin slipstreaming!

Step 1: Set Up Third-Party Programs in WinReducer 8.1

How to Slipstream Windows Updates Into Your Installation DiscS

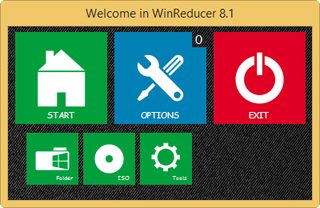
The first time you launch WinReducer, you'll see a configuration screen. The software detection section lists the five third-party software programs it needs. Copy the executables and the 7-Zip DLL from the programs you downloaded (7z.dll, 7z.exe, imagex.exe, oscdimg.exe, ResHacker.exe, and SetACL.exe) to the WinReducer81\HOME\SOFTWARE folder. After you've copied the programs, slide the switches in the configuration screen from "Off" to "On." Once all the switches are "On," close out of the configuration screen to start WinReducer.

Step 2: Mount Your Windows 8.1 Files
How to Slipstream Windows Updates Into Your Installation DiscS

Click on the Start button in WinReducer, then choose where your Windows 8.1 files are located. If you're using a retail disc, copy its contents to a folder on your computer, then click the Folder button in WinReducer to browse to that folder. If you're using a Windows 8.1 ISO, click the ISO button and navigate to your ISO file and mount Windows 8.1 to WinReducer.

Step 3: Download the Windows Update 1 Files

After Windows 8.1 is mounted in WinReducer, you'll see several configuration sections. Go to the System section, then click on the WinReducer Updates Tool button. Choose x86 for 32-bit Windows or x64 for 64-bit Windows, then click on the Update button. Check the box next to "Updates (Update 1) (6)" and any other updates you want to include in the new ISO, then click the Download button. When the downloads finish, back out of the Updates Tool, then enter the path to the updates in the Updates box: WinReducer81\WORK\INTEGRATE\UPDATES\x64 (for 64-bit Windows).

Step 4: Apply Other Customizations (Optional)

If there are any other customizations you'd like to make, go ahead and make them now (again, see our more advanced guide for this—otherwise you can skip this step).

Step 5: Apply Updates and Create a New ISO

When you're all set, click Finish, then Apply. This step can take quite a while, so you may want to get up and stretch, grab a drink, then come back to it.

When the ISO File Creator window finally appears, choose to save file as an ISO, then click Save. After several minutes, your custom ISO will be complete. At this point, you can either burn the ISO to a disc by right-clicking on it and choosing "Burn Disc Image." You can also use it to create a bootable USB flash drive, or save the ISO for future use.

That's it! Now you have a Windows installation disc with all the latest updates slipstreamed right in, making future installations easier and quicker. Keep it in a safe place and enjoy!


View the Original article

Kamis, 17 April 2014

Google updates its services to stop the bleeding

Google Logo AAThe Internet is all abuzz with news of the Heartbleed bug which was discovered in the popular OpenSSL encryption library. For those who haven’t heard, the OpenSSL library had a bug in it which means that a cyber-criminal or a government agency can decrypt all the traffic which was flowing over a supposedly secure connection. Most of us use secure connections when we sign in to Gmail or Google Play etc and send our email address and password to Google for verification. A secure connection is used so that an eavesdropper can’t read our passwords. This isn’t only true of Google services, but all the major services use HTTPS when we sign in or when you perform an online financial transaction.

Google has announced that it has updated the OpenSSL library on its servers (and we presume revoked the certificate keys) for Search, Gmail, YouTube, Wallet, Play, Apps, and App Engine. The search giant says that Google Chrome and Chrome OS are not affected.

Heartbleed is particularly severe because the bug has been in the OpenSSL library for two years and if a government agency did discover the bug (and didn’t tell anyone) then all past and future traffic to an exploited website is open for decryption. The reason is that the actual private keys which are associated with a site’s SSL certificate can be read. Once the keys have been read then all traffic to and from the site can be decrypted even traffic that was captured previously and stored away in a deep government archive.

heartbleed

Tumblr has suggested that today might be a good day to “call in sick and take some time to change your passwords everywhere—especially your high-security services like email, file storage, and banking.” The problem with Tumblr’s advice is that until the major services actually give the all clear, like Google has, then changing your password won’t be of any value as your new password can be just as quickly compromised. Only once a service has updated to the latest version of OpenSSL and revoked its certificates can users safely change their passwords!

The ironic thing is that Neel Mehta of Google was actually credited with finding the bug.

A few of Google’s services are still being updated most notable Cloud SQL, which Google says is being patched right now, and Google Compute Engine. In the case of the latter Google says that its customers need to manually update OpenSSL on each running instance or should replace any existing images with versions including an updated OpenSSL.

Google also reported that Android isn’t affected by the bug with the exception of Android 4.1.1. The bug is called Heartbleed as the error is related to the TLS heartbeat extension. Android 4.1.2 disabled the use of the heartbeat functionality for better wpa_supplicant interoperability.

The ironic thing is that Neel Mehta of Google was actually credited with finding the bug, so you would have thought that Google had a head start on fixing the issue and its services should have already been secure before the news hit the net. Maybe Google has become too much of a corporate for that to have happened!

Minggu, 13 April 2014

Enable OTA updates on Rooted Samsung Galaxy S3

Sterling Keys

Sterling Keys

After finishing his Bachelor of Commerce degree at the University of Alberta, Sterling made the move to Vancouver Island in British Columbia. Within a stone's throw of mountains, ocean, and complete wilderness, he mountain bikes and skis during the day and is hopelessly connected to his phone and computer at all other times. His writing "career" started as he penned about his escapades while skiing and has slowly progressed to freelance marketing and promotion throughout British Columbia. Interested in anything tech and gadget related, he has thoroughly enjoyed his transition of writing for AndroidPIT.

If you’ve had your Samsung Galaxy S3 for awhile, it's likely that you may have gone the route of rooting the device and installing either a custom ROM on it or pure Android. However, if you’ve gone ahead and done this, you’ll notice soon enough that you’ll no longer be able to receive official OTA updates, despite being given the constant reminder that they're available. We’ll show you how you can get back to having OTA updates so that you can get the latest firmware changes as they’re rolled out.

androidpit root galaxy s3 © AndroidPIT

Note: This will work as long as you’re running stock Android on your rooted Samsung Galaxy S3. If you’re running anything else, such as CyanogenMod, you’ll need to get stock Android first. As well, there is always a risk when you’re playing around with a rooted phone and this could cause you to brick your device, so follow this guide at your own risk.

First, you’ll need to confirm that your device is rooted (hey, don’t laugh, it’s important to check). Turn off the phone and then hold the Volume down, home, and power button while it boots up. Then you’ll use the Volume up when you see the warning and it’ll boot into Download Mode. You’ll see some text in the corner or your device and if you see that Current Binary is set to Custom and Current Binary Download is set to Yes, you’re good to go. Take note of the information on this screen as you’ll need to verify it later.

s3otaChecking the Download Mode information on your Galaxy S3. / © DroidLessons

Secondly, download TriangleAway from the XDA Developers Forum (thanks again to Chainfire for this!) and make sure your device is on the supported device list. If you downloaded the apk file to your PC, transfer it over to your Galaxy S3 once it reboots. If you’ve downloaded it straight to your device, just launch it from there using a File Manager. As well, you can support Chainfire by buying the app from Google Play and helping support him in his coding endeavors:

Once installed, let it have Super User permission and then check out the Current Status portion of the app. If the information matches what you had on the Download Mode screen, you’re good to go.  Hit Reset Flash Counter and let it do its thing: once the flash counter has been reset, your Galaxy S3 will reboot automatically.

triangle away chainfireCompare your information from Download Moade to your Current Status and then hit Reset Flash Counter. / © Google Play

If you boot back into Download Mode after using TriangleAway, you should see Current Binary set to Samsung Official and Custom Binary Download set to No. If so, that means that TriangleAway has done its job and you should be able to receive OTA updates on your device again!

galaxys32If TriangleAway worked, you should see the following on your Download Mode screen. / © DroidLessons

Has anyone tried it out? If so, how did it go for you? 


View the Original article

Samsung updates ChatON with the ability to delete sent messages

Kamran Farooqui

Kamran Farooqui

Curious by nature and a big techie at heart, Kamran is a big Android enthusiast, absolutely loves his Nexus 4 and believes that there is a special place in hell for people who prefer skinned Android over stock. When not vegetating, you will probably find him either struggling with his university essays or playing football or Call of Duty.

Samsung seems to be content with its strategy of throwing a bunch of new features and then seeing what sticks. Perhaps in a bid to increase usage of its own messaging platform ChatON, Samsung has pushed an update to it and has introduced a bunch of new features, the most intriguing of which is the ability to delete a message once it has been sent. But will that be enough for people to ditch their preferred messaging app such as the now ubiquitous WhatsApp or the hot new favourite Kik Messenger?

chaton v3.5

Perhaps taking a cue from Snapchat, Samsung has now given users the ability to recall sent messages which might be a potential source of embarrassment. Users can recall a message even after it has been read by the recipient, and can do that by simply tapping and holding the message bubble and then selecting ‘recall’. However, this feature only works in one-on-one chat rooms so that is something to keep in mind.

Another feature that Samsung has introduced is the ability to broadcast your real time location for a specific amount of time, which might come in handy the next time your friend refuses to believe you when you say that you are at some cool place. This feature comes courtesy of the integration with the Glympse application, however Samsung hasn’t mentioned whether you would need to have the Glympse app on your phone in order for the location sharing feature to work.

Samsung has also increased the file size cap to 1 GB so that larger multimedia files such as videos can be shared easily, and has also increased the capacity of group chats from 200 to 1001 persons, which could come in handy when interacting with a larger group of people.

So what do you think about these latest features in ChatON v3.5? Are the new features enough motivation for you to jump ship from your current messaging app?

Via: Engadget Source: Samsung


View the Original article

Sabtu, 12 April 2014

Samsung updates ChatON with enhanced messaging features

Samsung-ChatON-icon

Given that Samsung shifts a ton of handsets each year, there’s a good chance that a few of you out there have used, or are currently using, Samsung’s cross-platform ChatON instant messaging software. Samsung has just updated ChatON to version 3.5, which packs in some interesting new features.

First up, version 3.5’s major change comes in the form of a bolstering to the system’s file sharing capabilities. Users can now share larger media files than before, up to 1GB in size. However, there is a limit on this, users can only upload five large videos each day, which is probably as much as most people’s bandwidth would allow for anyway.

The second big change is the ability to recall sent messages. If you’re a typo prone individual, or just can’t keep messages in the right conversation, then message recall will allow you to remove your regrettable messages, even if they’ve already been read by other users. The sender simply taps and holds the message bubble and selects ‘Recall’ to remove the offending text.

Samsung Chat on version 3-5

ChatON 3.5 also comes with a few other tweaks and features, including real-time location sharing, increased capacity for group chats, the upper limit has jumped from 200 to 1,001 persons, and improved message integration, which allows users to manage their ChatON and SMS/MMS messages from the same sender in a single chat.

Finally, Version 3.5 adds in a number of new language translations, including Arabic, Turkish, Farsi and Hindi, bringing the total number of languages supported by ChatON to 14. If you’d like to test out these features for yourself, you can grab the app from the Play Store for free.