Diberdayakan oleh Blogger.
Tampilkan postingan dengan label Writing. Tampilkan semua postingan

Minggu, 27 April 2014

Bloggers: 6 Free Editing Tools For Better Writing

Editor’s note: This is a contributed post by Issa Mirandilla, who writes about freelancing, writing, marketing, careers, personal finance and other business-related topics. Give her a nudge on Twitter or visit her website here.

After hours of researching facts and figures, organizing your notes like crazy, and hammering away at your keyboard, you’re finally done with your killer blog post. Congratulations for making it that far. Not all blog post ideas get turned into working drafts. Now, all you have to do is edit. That might take anywhere from a few minutes to an hour, depending on the quality of your draft.

Seems like a lot of work, eh? That’s not really an issue if blogging is nothing more than a hobby to you. But when your entire livelihood depends on your ability to churn out posts on a daily basis, spending too much time polishing each post is impractical and dangerous to your business.

Of course, quality isn’t something you should sacrifice, no matter how clogged up your blogging schedule is. To solve this dilemma, you can either hire an editor to clean up your work, or purchase editing software online.

But then, in those cases, there’s no real guarantee that you’ll get what you pay for. So what’s a blogger who’s strapped for time and cash to do? Why, use these free editing tools available online, of course!

1. After the Deadline

After the Deadline (AtD) doesn’t just flag and give suggestions for your spelling, grammar, and style. It also concisely explains the reasons behind the corrections given. That means that the longer you use AtD, the better a blogger you become!

According to the developers, AtD can:

  • Recommend the right word 90 percent of the time;
  • Detect approximately 1,500 misused words;
  • Help you write clearly and concisely using thousands of rules in "Plain English" style
  • Use statistics to find exceptions to grammar rules.

AtD is available as a plugin, add-on, or extension for platforms like WordPress, bbPress, Firefox, Google Chrome, OpenOffice.org Writer, and the IntenseDebate comment system.

2. ProWritingAid

Like AtD, ProWritingAid not only tells you what to improve, but also how to improve. It has the ability to generate a detailed analysis on overused words, sentence length, writing style, plagiarism, clichés, redundancies, "sticky" sentences, consistency, and the like.

Although you need to download the Premium version to enjoy all of its features, ProWritingAid’s free version is enough for most types of blog posts.

3. EditMinion

Don’t let the site’s inelegant design fool you. EditMinion takes only a few seconds to check your work for the usual signs of weak writing, like adverbs, overuse of "said", passive voice, ending with prepositions, tricky homonyms and more.

EditMinion generates a report card for your reference, and allows you to add "hashtags" for easier editing. As of this writing, though, the site is still in Beta stage, so use it with care!

4. HemingwayApp

Ever wish you had Hemingway’s terse yet punchy writing style? Well, your wish can come true now, thanks to the brilliant minds behind HemingwayApp. Here, your copy will be assessed based on readability, number of adverbs, number of complex words, and number of times you use the passive voice.

The app also detects spelling errors, although it’s not much help in the grammar department. In case you need to use it offline, a desktop version of the app is also available for $5.

5. WordCounter

Whether you want to check for keyword frequency, or you just have a tendency to be repetitive with words, WordCounter.com is the answer. As its name suggests, WordCounter counts and ranks words according to frequency. The apps is great for reducing redundancy and/or repetitive writing in your copy.

You can also include "small" words, use only root words, and adjust the number of words listed by the app. You can use this primarily as an analysis tool, checking your drafts as you keep honing them to perfection.

6. ClicheFinder

Do cliches drive you crazy? If "Yes", ClicheFinder might be a godsend for you. Just paste your post in the space provided, click the "Find Clichés" button, and presto! Every cringe-worthy phrase will be highlighted in red. You can either rewrite these phrases to make them sound simpler and fresher, or toss them into the back-burner like the blights on language that they are (har har)!

If you experience the message "Unhandled Exception: An unhandled exception was thrown by the application," don’t be alarmed. It’s possible that your text doesn’t contain any clichés at all, so the system’s going all wonky on you.

Wrap Up

Naturally, all these programs have their pros and cons. Tools are only as good as the people who use them, and these six editing tools for bloggers are no different. It’s still up to you to decide whether their suggestions/corrections to your blog post are worth it or not. In any case, here’s to effective and efficient editing!

Do you know other free, downloadable, and/or safe editing programs for bloggers that haven’t been featured here? Share them in the comments section!


View the Original article

Kamis, 24 April 2014

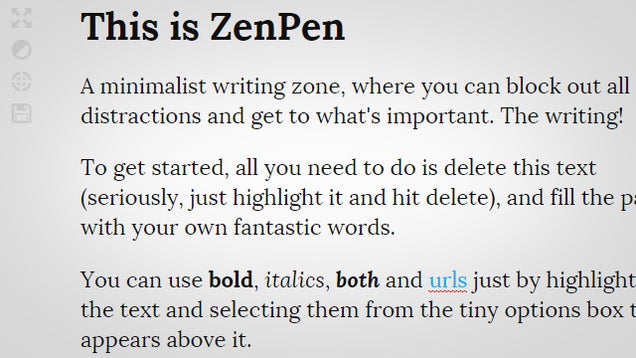
ZenPen is a Dead Simple, Distraction Free Writing Zone on the Web

ZenPen is a Dead Simple, Distraction Free Writing Zone on the Web

There are a lot of great distraction-free writing tools out there. If you'd rather not download an app, though, ZenPen is a wonderful web-based alternative with a simple design and minimal clutter.

To use the editor, simply go directly to the ZenPen site. Erase the starter text and start writing your own. It supports basic formatting like bold, italics, quotes, and links. You can set a word count target and save the whole thing in HTML or plain text when you're done. That's it. If you really want to minimize distractions while you're writing, head to ZenPen and press F11 to full screen your browser.

ZenPen | via Addictive Tips


View the Original article

Jumat, 18 April 2014

Myth – Writing CSS of the Future

CSS has introduced a slew of new features such as CSS Gradients, Shadows, Border Radius, and Animation that can all be achieved purely with CSS. There are also several features that have yet to be implemented due tolack of browser support for CSS variables and CSS calc() functions. But if you can’t really wait for the future, let’s check out Myth.

Myth, unlike other pre-processors that invent its own syntax, uses the same syntax as the standard spec. You can use variables, perform mathematical or color operations, and write new CSS properties in its official form. Its goal is to allow developers to write pure CSS, while also be able to utilize future-standard syntax, right now.

Getting Started

To get started, we need to install Myth binary to be able to compile it to the current CSS standard. There isn’t GUI application like Codekit or Koala that supports Myth at the time of writing, so this is the only way to compile Myth into browser-compliant CSS format.

In Terminal, type the following command:

npm install -g myth

You can then use this command below, for instance, to compile source.css into output.css.

myth source.css output.css

Or, type this to monitor the source.css and compile it to output.css for every change.

myth --watch source.css output.css

Myth does not introduce a new extension. It works with .css as shown above.

Writing CSS with Myth

Myth also does not introduce proprietary functions and rules like the other CSS Pre-processors, so you should be able to get used to Myth almost immediately. It is like plain CSS.

Variables

Let’s start with Variables. In CSS, a variable is declared, like so:

:root { var-length: 10px; var-color: #000;}.class { background-color: var(color); width: var(length);}

Myth compiles this code into browser-compliant format:

.class { background-color: #000; width: 20px;}

You can refer to our previous article about Using CSS Variables for more details.

Math Operations

As mentioned, we can also perform mathematical operations with the new CSS3 calc() function. We have also covered this function in our previous article: Using CSS3 Calc Function.

Let’s extend our first example with it:

:root { var-length: 10px; var-color: #000;}.class { background-color: var(color); width: calc(var(length) / 2);}

Myth compiles the above codes into:

.class { background-color: #000; width: 10px;}

Color Adjustments

Myth also supports some color operations or adjustments like in LESS or Sass. A new standard function for it is proposed to be included in CSS spec named color() — including a set of color-adjusting functions such as tint(), shade(), and blend() just to name a few.

Below is one example: we increase the background color’s lightness by 80% and decrease the border color by 50%.

:root { var-length: 20px; var-black: #000; var-white: #fff;}.class { background-color: color(var(black) lightness(+ 80%)); border: var(border-width) solid color(var(white) lightness(- 50%)); width: calc(var(length) / 2);}

That code will produce:

.class { background-color: rgb(204, 204, 204); border: 2px solid rgb(128, 128, 128); width: 10px;}

Autoprefixer

Myth will also automatically add vendor prefix to CSS properties. We can simply write, for instance, CSS Box Shadow, this way:

.class { box-shadow: 2px 1px 0px var(black); }

The output is:

.class { -webkit-box-shadow: 2px 1px 0px #000; box-shadow: 2px 1px 0px #000;}

Final Thought

I love the idea of Myth. With it, we can write pure CSS of the future today without worrying about browser support. And since it uses the standard syntax, later when all browsers have implemented it (as the standard), we won’t need to rewrite all the code. I think I’m going to start using it in every one of my future projects. What about you? Will you adopt the same?


View the Original article

Sabtu, 22 Maret 2014

Capture your Readers: 8 Tips to Writing Engaging Blog Posts

Editor’s note: This is a contributed post by Issa Mirandilla, who writes about freelancing, writing, marketing, careers, personal finance and other business-related topics. Give her a nudge on Twitter or visit her website here.

Remember how Ratatouille’s Chef Gusteau said: "Anyone can cook, but only the fearless can be great"? You can easily rewrite his inspiring words as, "Anyone can write a blog post, but only the fearless bloggers can be great."

See, a good idea or topic, decent spelling and grammar, and a strong mastery of the essay form are enough for a good blog post. But if you want to write a great blog post, or one that makes people go "Wow! I’ll share this on Facebook!" instead of "Meh, this is nothing special", you have to go further than the essentials.

Here’s how you can do it.

1. Hook Them With The First Sentence

Admittedly, this is the hardest part of writing a blog post. That’s because the first sentence should be able to reel in the reader, and at the same time, give them an idea what your post will be all about.

You can start with a:

  1. Thought-provoking question – "Do you know what a blog post and a sandwich have in common?"
  2. Quote – "Ernest Hemingway once said: ‘There is nothing to writing. All you do is sit down at a typewriter and bleed.’
  3. Statistic – "According to the Official Federation of Bloggers*, 99.9 percent of bloggers experience writer’s block."
  4. Story – "The other day, I had a Newtonian experience. That is, an apple fell on my head."

*Disclaimer: This is a hypothetical example. As of this writing, the Official Federation of Bloggers doesn’t exist.  

2. Make Every Word, Phrase & Sentence Count

Because Internet users’ attention spans are shrinking by the day, you have to work harder to hold your readers’ attention from the beginning until the end of your post. To do that, every word, phrase, sentence, and even punctuation mark must add something to your piece.

A handy trick is to read your draft out loud. If it feels like you’re explaining things too slowly, or you’re falling asleep to your own voice (gasp!), you may need to edit the extraneous bits. Your draft could possibly feel "incomplete", in which case, you can insert additional information to clarify your thoughts or strengthen your arguments.

3. Shorten Your Sentences, If Possible

In relation to the tip, here’s a rough guide to help you decide whether you should cut down a kilometric sentence.

Do your eyes glaze over while reading a sentence? Do you read a sentence out loud, and lose your breath by the end of it? Do you see too many adjectives, adverbs, and other words that don’t add anything to a sentence?

If any of these happen, shorten it! Otherwise, that kilometric sentence is probably fine as is.

4. Use Simple, Yet Precise, Words

You know how MS Word’s "Shift + F7" pulls words from the more obscure parts of the thesaurus? Well, you might not want to rely on that function too much. Readers hate it when you bombard them with highfalutin jargon. Not only do these words sour the reading experience, but they also make your blog post look stilted and pretentious.

Instead of trying to sound "smart", try to sound sensible. Use words that best convey your idea and can be understood by the layman. For example, "to utilize resources" can be shortened as "to use resources".

5. Play With Analogies

Blogging is like dating. It’s not enough that you make a great impression on the first date. You also have to show, again and again on your following dates, that you’re a person worth someone’s time, commitment, and love.

See what I did there?

6. Throw In A Few Pop Culture References

Pop culture references add flavor to your blog post. They give your readers the impression that you’re relatable, and therefore likeable.

That said, be mindful of your audience when using these references. You may think that "The Beatles" are the greatest rock band of all time, but referencing the Fab Four while writing for "One Direction" fans may not be the best idea in the world.

7. Make Your Post Unique (Even If The Idea Isn’t)

Let’s face it: coming up with 100% original blog post ideas is anything but easy. If you run your topic through a quick Google search, chances are someone else has already written about it. So, what should a blogger do in this scenario? It’s simple, really.

Find a new angle.

If someone already came up with "5 Reasons Why You Should Try Freelancing", you can write a post about the darker side of freelancing like "20 Reasons To Say ‘No’ To Freelancing". Or you can run with "5 More Reasons Why You Should Try Freelancing".

8. End With A Punchy Conclusion

So, you’re done with your introduction and body. Now, it’s time to write the conclusion, which is just as hard to write as (if not harder than) the introduction. The easiest way out of your dilemma is to summarize all your points in the conclusion. Then again, that would be boring, since that’s what most bloggers do.

Instead, you can either end with a thought-provoking question or a call-to-action; or restate your main point, and persuade your reader to care about your point.

A Few More Tips (a.k.a. Something That Resembles A Conclusion)

These rules aren’t set in stone. Feel free to use them – or not – depending on what’s appropriate for your piece. What matters is consistently writing posts that are engaging, informative, and unique enough to keep your readers coming back for more.


View the Original article

4 Signs You Are Losing Your Writing Passion (& How To Get It Back)

Many of us have been through this at one time or another. Tired and worn down from writing the same boring content and making it interesting day in and day out, we suddenly find that we have to drag ourselves to the computer and force ourselves to go through the motions wondering what we should be doing with our lives instead.

Then it hits us. We realize we’ve lost the passion and terror engulfs us. The first time it happens is like waking up from a dream of falling off a building – only to realize that you’re not dreaming. You experience a few seconds of abstract terror followed by a deep sense of sudden loss.

I once read about a writer who lost limbs in a war compare it to what it feels like the first few years after that loss: “I would wake up, ready to take on the day only to see the wheelchair and remember that I have no legs. Losing my passion for writing is a lot like that.” Once you realize you are without it, you cannot help but feel a sense of longing.

Personally, it felt a little bit like when I lost my father at 11 years old. Not the pain of a lost loved one. Just the pain of losing something so familiar, something I was so used to having. It felt like a hole in the middle of my chest that couldn’t be filled. I swore that once I got it back, I would never lose it again. Now, when I get so weary that I want to stop, I do.

See The Signs

The one redeeming feature about losing the writer’s passion is that you can see it coming a mile away, if you know what to look for. Here’s how to recognize these signs.

1. When Research Becomes a Chore

Research for the true writer is more interesting than it is work. We develop a process where we can enjoy the journey from point A to point J. Each step is familiar, painless and gets us closer to our objective – writing. Every step of the research usually holds some benefit for us.

One example is my research computer, which is not the computer that I write with. It has a comic’s page that I must go through to get to my search engine. On this page is a weather app, a dictionary Word of the Day, and a new Calvin and Hobbes Comic daily strip

When I get to the point that I skip the comics or just bypass my entire process altogether, I check myself as it’s a sure sign that I’m no longer enjoying that process… or what I do.

2. Snapping at your Editors (Never a good idea)

I’m one of those lucky writers that have an editor as a partner in our freelance writing company. This means that everything I write through our company is edited by one of the best. I also have an editor in one of my ‘outside of the company’ jobs. She is also among the best in her profession.

The moment one of them asks me what is wrong with my attitude or takes offense at something I’ve said, I know that I’m in trouble. I love to be edited because it makes me look good. When I start taking offense at their help, it means I don’t want to put in the work. It means I’m no longer having any fun.

3. What Happened to your Deadline Demon?

A friend of mine, who was once a client, paid me the very high compliment of calling me the Deadline Demon. I never ever miss a deadline. I’m almost always way ahead of schedule. I make sure that if something was to happen and I could not write for up to a week, I could still come in under deadline.

When I suddenly have to write all night long and just barely make my deadlines, I am in trouble of losing my passion and I check myself at that moment. If I forget a deadline and barely make it, I recognize that for what it is: a huge sign that I’m tired and I’m in danger of starting down that road again.

4. Getting Easily Distracted

When I start catching myself spending more time in my email, Skype chat, or surfing the World Wide Web for no reason other than to avoid work, I know I’m in trouble. It’s a quiet process that sneaks up on you. One day, you are fine and productive, two days later, you find yourself two days behind schedule and filling out a form for a foolish website application you don’t want just because you’re bored.

When boredom sets in, how far are you from the point of no return? The writing passion is what keeps us writing. The ability to take a boring subject and turn it into something that people want to read is supposed to be fun. When it stops being fun, it’s time to recharge your batteries.

How To Turn This Around

At some point, you have to recognize the signs of writer’s fatigue and make a change. When you have worked for so many days in a row that you cannot remember the last time you had any time to devote to your family, friends, or other interests, it may be time to recharge

Writer’s fatigue is the first step to losing the ability to enjoy a passion that you were born with. Here are a few things you can do to get turn things around.

1. Step Away

Take a day off whether you can afford it or not. Most of the time, with bills mounting or deadlines looming, you cannot take a day off at that moment, but you can schedule a day off in the near future and then do everything you have to do to make it happen.

When that day comes, do not shirk it off and work. Force yourself to spend the day away from work and (this is important) with the people that make you happy.

2. Revisit Your Creative Side

Write for yourself. If you like creative writing, do that. If you enjoy poetry, create a new form. Enter a contest and write up your submission. Even if you don’t win, the fun is in the creation.

There are numerous website writing groups that you can join that have contests. There are also writing groups that love to read new fiction or collaborate on projects. The point is to write something for yourself that changes your perspective and is not work-related.

3. Retrace the Steps that Led you to Freelancing

Take stock of your decision to become a freelance writer. From experience, I can tell you that our reasons for doing what we do are very compelling. In my case, it was this or work for a living and I would rather do this. Remember all the reasons you do what you do. Write and you will find that motivating force that drove you here in the first place.

Once you remember why you love your job so much, it’s easier to keep your passion, even under the worst of client projects. When I see my stepson dragging his tired ass home from his roofing job, I count my blessings and get back to work.


View the Original article